
About
All feedback (27)
- simplysadia (3495)- Feedback left by buyer.More than a year agoVerified purchaseWe appreciate your business, thank you! If everything is satisfactory, please take a moment to leave a positive review. Thanks ����
- rivercitycollection (353)- Feedback left by buyer.More than a year agoVerified purchaseGood buyer, prompt payment, valued customer, highly recommended.
- seattlegoodwill (356002)- Feedback left by buyer.More than a year agoVerified purchaseExcellent Buyer! A+++ Thank you for your Support! --Seattle Goodwill
- partsforless2014 (12705)- Feedback left by buyer.More than a year agoVerified purchaseGreat communication. A pleasure to do business with.
Reviews (1)
Dec 01, 2020
The right fix for (most) GE convection ovens not working properly
Background:
The product is exactly the right fix for correcting what's probably the most common reason for the
dreaded "convection oven not working properly" problems. For whatever reason(s), this part seems to die with distressing frequency, so- if your GE convection oven stops producing good results (i.e., inconsistent cooking results, longer-than-normal cooking times, etc.), this is one of the first things to check...Save yourself hundreds of $$$ by following the simple, easy steps below. You can do it!!!
To confirm that your oven's convection fan is not working properly, simply turn it on to a convection setting ("convection bake" or "convection roast", for example), let it come up to whatever temperature you've set, and turn on the oven light. Once it reaches the temperature you set, keep the door closed and look inside: you should see the convection fan spinning in the oven. If it's not spinning, you've got a problem!
Note that there are several reasons why the fan may no longer be working: it could be a "dead" fan assembly (this is the part being reviewed here), the controller board could be defective, etc. Of all of these reasons, the fan assembly being "dead" is the most likely culprit. If you're comfortable using a multimeter, you can quickly confirm what part has failed; if you're not, replacing this fan assembly is a good- and relatively cheap- place to start for making the repair.
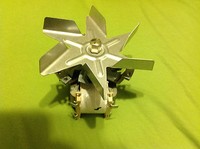
Product Review:
The fan assembly itself is well-built and comes as a preassembled, integrated unit: motor + cooling fan + circulation fan. Because of this, it's ready to install straight out of the box, with no assembly required. The actual replacement is quick and easy; there are a lot of YouTube videos that will show how to do it. The gist of it is, though, straightforward: remove the fan's cover inside of the oven (and all associated screws) and then do the same to the fan cover on the back (outside) of the oven. You probably won't have to remove the entire back panel of the oven, but on some models this may be necessary. Even if you do, it's not a difficult thing to do!
With all of the retaiing screws out, the fan assembly should slide out without too much effort. Look at the three wires providing power to the unit (taking a picture on your phone is always a good idea!) and note which one goes on which of the three terminals on the fan assembly. Carefully slide these three connectors off of the terminals and reattach them to the correct terminals on the new (replacement) fan assembly. Put the new assembly back into your oven, reattach the back cover, and then the cover inside of the oven. Congratulations- you've just fixed your oven!
NOTE: If you're unlucky and your convection fan still doesn't work after making this repair, you'll need to dive more deeply into diagnosing the problem(s) with your oven. You will want to check the controller board, among other things. However, replacing the fan assembly will solve the problem in most cases (probably > 80 - 85% of the problems) - so, with any luck, you won't have to do anything other than replace the fan assembly to be back in business!