Your vehicle’s engine needs three things to run: air, fuel, and a spark. Air is everywhere, but it is also full of dirt and contaminants that could harm your engine. Dirty air wears down the piston rings, cylinder walls, valves, and seals. It also gets into engine oil, which makes it abrasive to your bearings.
Your engine has one line of defense against these air contaminants: an engine air filter.
You should change your engine air filters every two years. That equates to between 15,000 and 30,000 miles. However, many owners go much longer than that, resulting in reduced performance, lower fuel economy, and increased engine wear. Change your air filter before it gets clogged.
Trick and Tips
- If you are unsure about your engine air filter’s condition, hold it up to the sun or a bright light. If you can see light through most of the filter, it can last longer. If it’s dark, replace it.
- Most air filters are one-time use. Toss the old one and replace it with a correct new filter.
- A reusable (cleanable) filter costs two to three times as much as a standard filter but, with periodic cleaning, it can last the lifetime of your car.
- You can usually change an engine air filter without tools, although some vehicles require a socket or screwdriver.
What you’ll need


Most vehicles have only one air filter, but some have two. Check your vehicle’s owner’s manual for details about filter locations.
For most modern vehicles, the air filter is attached to the engine via a large round air tube. It typically resides in a large plastic housing (box) on one side of the engine bay.
You may need to remove a bracket, brace, or trim panel to access the air filter.

Shop this step
Most modern vehicles use spring clips or latches to secure the lid to the box holding the filter.
Pop the clip off the lid. There may be several clips.
Some vehicles use bolts or screws to secure the lid. These are more tedious to remove. After removing the fasteners, store them in a safe spot.

Lift up the lid to remove it. Some vehicles have hinged lids. Others, like our demo vehicle, use side tabs to secure the lid.

You might need to remove the lid from the air inlet tube to get the air filter out of the housing. If that’s the case for your engine, loosen the hose clamp to remove the tubing.

Lift the filter to remove it from the air box. Most filters have a rubber or foam seal around the edges.
Look inside the air box for debris like leaves. Use a damp rag and clean it.

Shop this step
Insert the new filter into the air box in the same orientation as the old one. Air filters are directional. Look for an arrow on the filter, indicating the air-flow direction.
The open pleats typically face the dirty side, and the dirty side is usually on the bottom. That allows dirt to fall out of the filter and drop inside the housing.
The filter should seat firmly into the air box without gaps, bulges, or puckered edges. If the filter is not seating properly, remove it and look for debris or pleats that are folded over the edge.
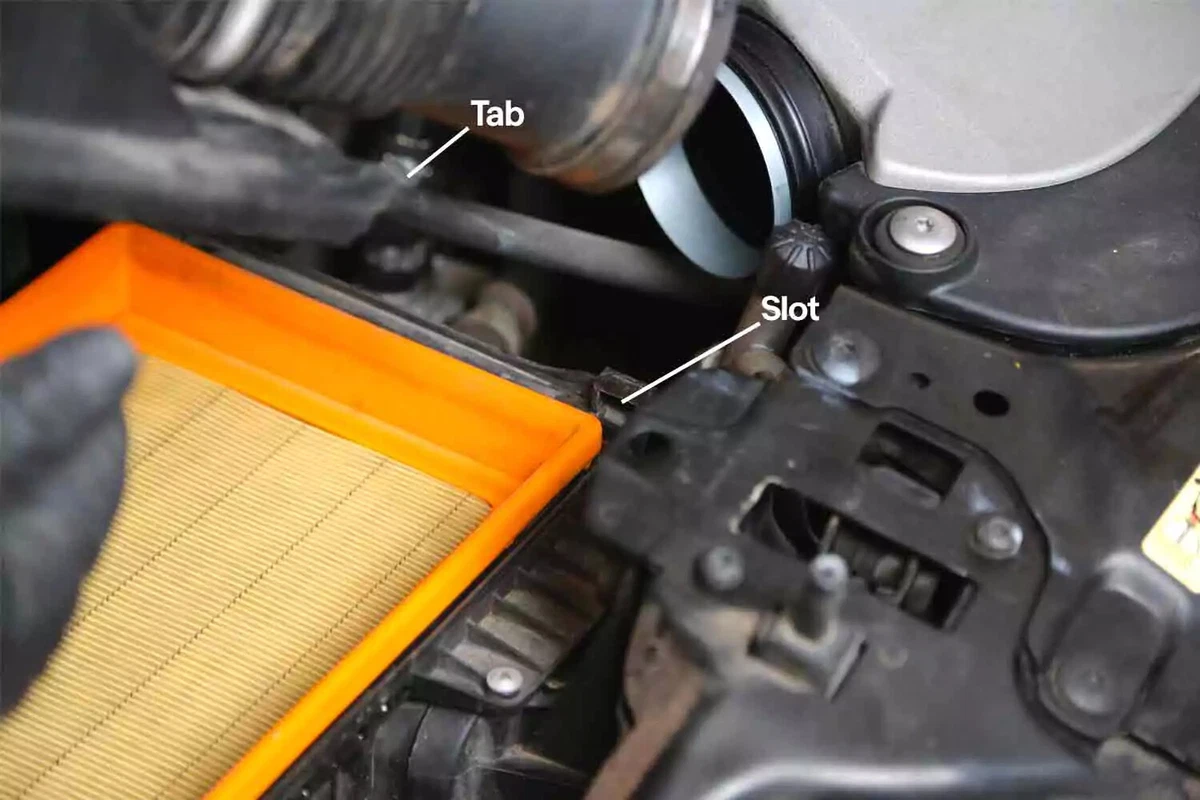
Note the slot tab at the back of the air box. The lid tabs must fully engage with this slot to close.

Attach the lid to the air box. Most housings use tabs. Make sure the tabs or alignment pins are fully engaged and that the filter is not pinched or out of position.
If the housing doesn’t close easily, realign it to close properly or remove anything in the way.

Use the original fasteners or clamps to lock the lid. Spring clamps as shown might require pressure to snap over the lid.
If your vehicle uses threaded fasteners, don’t over tighten them. Hand-tight is suitable.

Shop this step
If you loosened or removed the air inlet tubing, reattach and tighten the hose clamp.
Reset any dashboard messages about needing to replace your air filter.
About the author

Share your feedback
This article is meant to provide general guidance only. Automotive maintenance, repair, upgrade, and installation may depend on vehicle-specifics such as make and model. Always consult your owner's manual, repair guide for specific information for your particular vehicle and consider a licensed auto-care professional's help as well, particularly for advance repairs.
Shop project essentials
Recommended for you
Find answers and inspiration

Expert Advice for Checking Your Vehicle’s Engine Oil Level

6 Ways to Dress Up Your Engine

Symptoms of a Bad Crankshaft Sensor

Diagnosing and Replacing a Bad Car Starter

How to Replace Engine Mounts
4 min read
The Right Tools to Clean Your Fuel Injectors
6 min read
How to Replace an Exhaust Gasket
9 min read
How to Buy the Best MAF Sensor
4 min read
Ignition Wire Buying Guide
6 min read
A Complete Guide to Cylinder Heads

Purpose of the Engine Mount and Signs of Failure

A Quintessential Monster Miata with a Mustang V-8

How to Buy the Right Ignition Coils
7 min read
Chevrolet LS9: The Ultimate LS-Series Engine

How to Change an In-Tank Fuel Pump
9 min read
Squeaks, Clangs and Rattles: Car Noises That Need Attention

Why Regular Care of Your Fuel Pump Is a Must

All About Crankshafts and How They Work

Interpreting Engine Codes Is Easy With Right OBD Reader

How to Clean a Carburetor

A Quick Guide to Valve Cover Gaskets
6 min read
How to Replace a Fuel Filter
7 min read
How to Replace a Throttle Body
6 min read
Finding the Best Engine Air Filter for Your Car
4 min read
Do You Have a Faulty Mass Air Flow Sensor?
4 min read
What to Do About a Dirty Oxygen Sensor

Buying the Best Portable Car Battery Jump Starter
6 min read
What You Should Know About O2 Sensors
6 min read
Understanding Your Car's Idler Pulley
4 min read
How to Test an Alternator (And Fix It!)

How To Fix a Crankshaft Position Sensor Wiring Harness
7 min read
Why Is Your Car Burning Oil?

When to Replace Your Exhaust Manifold Gasket
6 min read
An Overview of Car Engine Parts
5 min read
What Is a Camshaft Position Sensor?

4 Easy DIY Upgrades of Your Car's Ignition System

How to Replace a Distributor Cap and Rotor
5 min read
Identifying Common Engine Leaks

Ignition Coils Help Spark Horsepower

Everything You Should Know About Glow Plugs

P0420 Engine Code: What It Means and How to Fix It
5 min read
Everything You Need to Know About Fuel Filters
6 min read
Engine Mounts 101
4 min read
5 Small Car Maintenance Tasks To Prevent Big Problems Later

How to Replace a Serpentine Belt Tensioner
4 min read
Can a Cold Air Intake Add 30 Horsepower?

Spotting Intake Manifold Gasket Problems
7 min read
Symptoms and Fixes for a Bad Thermostat

How to Replace an Ignition Coil
6 min read
Custom Exhaust Tips: Make a Statement with Your Tailpipes

What to Expect From an Emissions Test

All About Cylinder Head Gaskets

All About Mass Air Flow Sensors

How to Fix Low Oil Pressure

How to Find and Fix an Exhaust Leak

How Much Does an Alternator Cost?

Why Is a Hemi Engine So Special?

The Difference Between Camshafts and Crankshafts
4 min read
Get Your Classic Car Ready for Winter

Engine Air Filter Change 101

Engine Blocks: Everything You Need to Know

Troubleshooting a Car That Doesn’t Start

What Does the Check Engine Light Mean?

Deciding to Buy Original or Aftermarket Auto Parts: Quality and Selection

How Long Do Car Batteries Last?

How an Oil Pump Works

The Anatomy of a Spark Plug

How To Gap a Spark Plug

How to Replace an Intake Manifold Gasket
7 min read
Cabin Air Filter vs. Engine Air Filter: What’s the Difference?

Why Your Car Won’t Start

What You Should Know About Cylinder Heads

How to Replace Ignition (Spark Plug) Wires
5 min read
4 Types of Water Pumps

Signs of a Bad Car Battery vs. Alternator

What Is a PCV Valve? And How to Replace One

Engine Oil Flush 101

Online Videos Are a Game-Changer for DIY Car Repair

When to Replace Your Drive Belt
6 min read
How to Buy the Right O2 Sensor
5 min read
What Is a Catalytic Converter and Why Are People Stealing Them?

Synthetic Oil or Conventional Oil: What’s Best for Your Vehicle?

All About Engine Leak Down Testing
A Guide to Cleaning a Throttle Body

How to Remove Rusted Nuts and Bolts

Timing Belts 101
5 min read
Cleaning Your Engine Bay: Step-by-Step Instructions

How to Do an Engine Compression Test
5 min read
How to Buy the Right Car Distributor
6 min read
Choosing the Best Intake Manifold Gasket
7 min read
What Does the Dashboard Oil Light Warning Mean?

The Brave New World of Ultra-Easy Fuel Injection

Your Complete Idler Pulley Buying Guide
5 min read
How to Replace an Alternator Belt

How to Choose the Best Oil Filter

Deciding to Buy Original or Aftermarket Auto Parts: The Online Transaction

How to Jump Start a Car Battery

Buying the Right Engine Mount
5 min read
All About Exhaust Gas Recirculation (EGR) Valves

Winter Car Prep: 5 Essential Articles

Five Signs Your Spark Plugs Need Changing

How to Replace an Oxygen Sensor
5 min read
Make an Old Car Run Like New: Four Common Sense Tips

All About Your Distributor Cap and Rotor
7 min read
How to Replace a Valve Cover Gasket
7 min read
Easy DIY Project: Replace an Oxygen Sensor

Car Starter Motors and How Long They Last

How to Replace a Car Starter
7 min read
How to Clean Fuel Injectors
8 min read
What to Check and What to Replace at 100,000 Miles
4 min read
MAP Sensors and Managing Air Flow

How Long Does an Oil Change Take?

The Weirdest Oddball Car Engines of All Time

How to Choose the Best Spark Plugs
5 min read
All About Vehicle Emission Systems

Tax Refund on the Way? It’s Time to Think About Supercharging

Signs That a Timing Chain Needs Replacement
5 min read
Brake Cleaners Versus Carburetor Cleaners

How to Replace an EGR Valve
5 min read
An Expert Guide to Exhaust Systems

How to Buy the Right Valve Cover Gasket
4 min read
Car Muffler Types and How They Change Your Exhaust Note

Explaining the Throttle Body and Throttle Position Sensor

How Long Do Electric Car Batteries Last? And Other EV Questions

Ethanol Fuel Boosts Performance and Costs Less

Spark Plugs 101
7 min read
The Alternator Is Your Car’s Little Electric Power Station

One Day Project: Rebuild Your Carburetor

Should You Rebuild or Replace Your Carburetor?

Taking Your Car to the Track: The Ultimate Guide

Try a Catalytic Converter Cleaner Before an Expensive Repair

The Right Liquids for High-Performance Engines

In Age of Computerized Cars, Tuning Gets an Update

How to Buy the Right Timing Belt and Related Tools
5 min read
NASCAR Engines Versus What Powers Your Car

How To Choose the Best Supercharger

Understanding Battery Sizes (and Battery Group Size Charts)

How to Buy the Right Exhaust Manifold Gasket
6 min read
History of the Rotary Engine: Past, Present and Future

How to Change a Timing Belt
12 min read
How to Buy the Right Throttle Body
5 min read
Clean Fuel Filters Are Critical for Performance

How to Change Your Oil: Visual Step by Step Guide

How a Car Engine Works

Why an Engine Overheats and How to Fix It

Everything You Need to Know About Car Starters
7 min read
Reduced Engine Power and What To Do About It
5 min read
Regularly Check These 4 Car Fluids

How to Buy the Right Car Starter
5 min read
Understanding Engine Horsepower vs. Brake Horsepower

Distributors 101
6 min read
How to Change Oil in a Car
8 min read
Cold Air Intake 101: How It Works

How to Clean Or Replace Your Air Filter

Top Candidates for an Affordable V8 Swap

Are Ticking Engine Noises a Warning? Or Just Annoying?

Types of Twin Turbos (And Why You Want One)

Carburetor 101: Maintenance and Cleaning

How Solenoids Work in Starters and Automatic Transmissions

An Introduction to Cleaning Fuel Injectors
5 min read
Choosing a Supercharger Versus Turbocharger

How to Get Started with an LS Engine Swap

P0302 Engine Code: What It Means and How to Fix It

The Dry Sump System Explained

How to Replace a Mass Air Flow (MAF) Sensor
7 min read
Facts About Diesel Exhaust Fluid

Protect Your Catalytic Converter with a Shield or Lock

What Octane Is Best for Your Car?
4 min read
Buying the Right Serpentine Belt and Tensioner
4 min read
A Performance Data Recorder (PDR) Adds Racing Analytics to Your Car

Deciding to Buy Original or Aftermarket Auto Parts: The Basics

What to Know About Your Vehicle's Throttle Body
6 min read
A Guide to Car Clutches

Diagnosing Your Serpentine Belt and Tensioner
6 min read
Choosing the Best Drive Belt for Your Car
6 min read
How to Replace a Fuel Pump

Basic Car Maintenance Is Simpler Than You Think

The Importance of the Drive Belt Tensioner

Why You Should Add an Engine Oil Cooler

How to Replace a PCV Valve
6 min read
Buying the Right PCV Valve
4 min read
Hisses, Whines, and Rattles: What Your Car Is Trying to Tell You

Carburetors vs. Fuel Injection: For Show or Go?

Taking Vintage Cars Out of Storage: Planning for Spring

All About Exhaust Gaskets

Buying the Right Distributor Cap and Rotor
4 min read
How to Replace Spark Plugs
7 min read
What Is a Serpentine Belt and How Do You Change It?

How to Replace a Drive Belt
5 min read
Tips and Tricks to Manage Engine Heat

An Essential Guide to Timing Belts

How to Test Your PCV Valve
6 min read
Everything You Should Know About EGR Valves
5 min read
A Deep-Dive Guide to Ignition Wires
7 min read
When to Replace Your Engine Air Filter
5 min read
Choosing the Right Fuel Filter for Your Vehicle
6 min read
How to Pick the Right “Parts Car”

How to Choose the Best Fuel Pump
6 min read
OBD Port Uses for Amazing Digital Car Hacks

How to Use an Engine Timing Light

ECU 101: What Is an Engine Control Unit?

Causes and Cures for Oil Pan Leaks

How to Tune Your Exhaust Note
Choosing the Best Motor Oil

How Do Ignition Coils Work?
5 min read
Fuel Pumps and How They Work
8 min read
What a Fuel Pressure Gauge Does and Why You Need One

4 Bolt-On Engine Power Upgrades That Add Crazy Combustion

Changing Your Oil: 5 Things to Know
6 min read
How Does Engine Braking Work?

How to Buy the Right EGR Valve and Gasket
6 min read
Big Block vs. Small Block: Which Engine Is Best?

How to Choose the Best Motor Oil
8 min read
A Double Whammy: Combining a Supercharger and Turbocharger
Explore more projects
How to Replace a Fuel Filter
30 to 60 minutes
Beginner
7 min read

How to Replace Sway Bar End Links and Bushings
30 to 60 minutes
Beginner
6 min read
How to Replace a Throttle Body
30 to 60 minutes
Beginner
6 min read

How to Replace a Clutch Master Cylinder
1 to 2 hours
Beginner
11 min read

How to Replace a Brake Caliper
1 to 2 hours
Beginner
7 min read

How to Replace Transfer Case Fluid
Less than 30 minutes
Beginner
5 min read
How to Replace a Valve Cover Gasket
Less than 30 minutes
Beginner
7 min read
How to Change Oil in a Car
Less than 30 minutes
Beginner
8 min read

How to Jump Start a Car
Less than 30 minutes
Beginner
9 min read

How to Change a Car Battery
Less than 30 minutes
Beginner
6 min read

How to Repair a Chipped Windshield
1 to 2 hours
Beginner
7 min read

How to Replace Transmission Fluid and Filter
1 to 2 hours
Beginner
11 min read
How to Replace a Drive Belt
Less than 30 minutes
Beginner
5 min read

How to Replace a Radiator Hose
Less than 30 minutes
Beginner
5 min read

How to Replace a Cabin Air Filter
Less than 30 minutes
Beginner
5 min read
How to Clean Fuel Injectors
1 to 2 hours
Beginner
8 min read
How to Replace a Distributor Cap and Rotor
30 to 60 minutes
Beginner
5 min read

How to Change a Headlight Bulb
Less than 30 minutes
Beginner
6 min read
How to Replace a Mass Air Flow (MAF) Sensor
Less than 30 minutes
Beginner
7 min read

How to Refill Windshield Washer Fluid
Less than 30 minutes
Beginner
4 min read

How to Replace Shock Absorbers
30 to 60 minutes
Beginner
8 min read

How To Replace Differential Fluid
Less than 30 minutes
Beginner
8 min read

How to Replace Brake Rotors
1 to 2 hours
Beginner
7 min read
How to Replace an Exhaust Gasket
1 to 2 hours
Beginner
9 min read
How to Replace an EGR Valve
30 to 60 minutes
Beginner
5 min read

How to Replace an Alternator
1 to 2 hours
Beginner
11 min read

How to Replace an Idler Arm
30 to 60 minutes
Beginner
5 min read

How to Replace Clutch Fluid
Less than 30 minutes
Beginner
6 min read

How to Change Disc Brake Pads
30 to 60 minutes
Beginner
8 min read
How to Replace a Serpentine Belt Tensioner
Less than 30 minutes
Beginner
4 min read

How to Check Tire Pressure and Change a Tire
Less than 30 minutes
Beginner
9 min read

How to Flush and Change Engine Coolant
30 to 60 minutes
Beginner
6 min read

How to Replace Brake Fluid
1 to 2 hours
Beginner
10 min read

How to Change Windshield Wipers
Less than 30 minutes
Beginner
3 min read
How to Replace an Ignition Coil
Less than 30 minutes
Beginner
6 min read
How to Replace an Oxygen Sensor
30 to 60 minutes
Beginner
5 min read

How to Replace an Idler Pulley
30 to 60 minutes
Beginner
4 min read
How to Replace a PCV Valve
30 to 60 minutes
Beginner
6 min read

How to Rotate Your Tires
30 to 60 minutes
Beginner
5 min read