Modern vehicles use electronic fuel injection to feed fuel to the engine. This is an incredibly complex system of modules, wires, sensors, injectors, and computers that efficiently use air and fuel to maximize fuel economy and power. It can also be challenging to troubleshoot and repair without expensive scanning tools.
What you’ll need


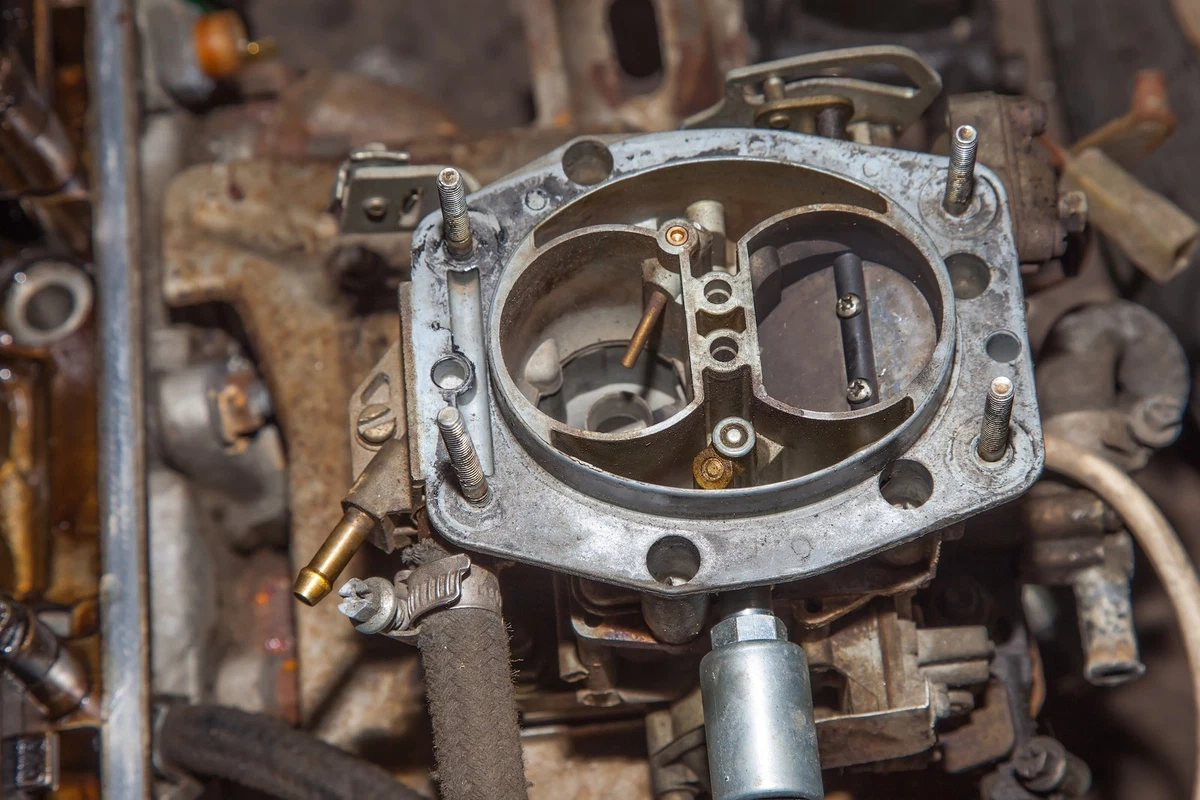
All of this was developed to replace one component that did the same job: the carburetor. Almost every vehicle built before 1987 came with a carburetor, so a little maintenance will help it operate as well as it can.
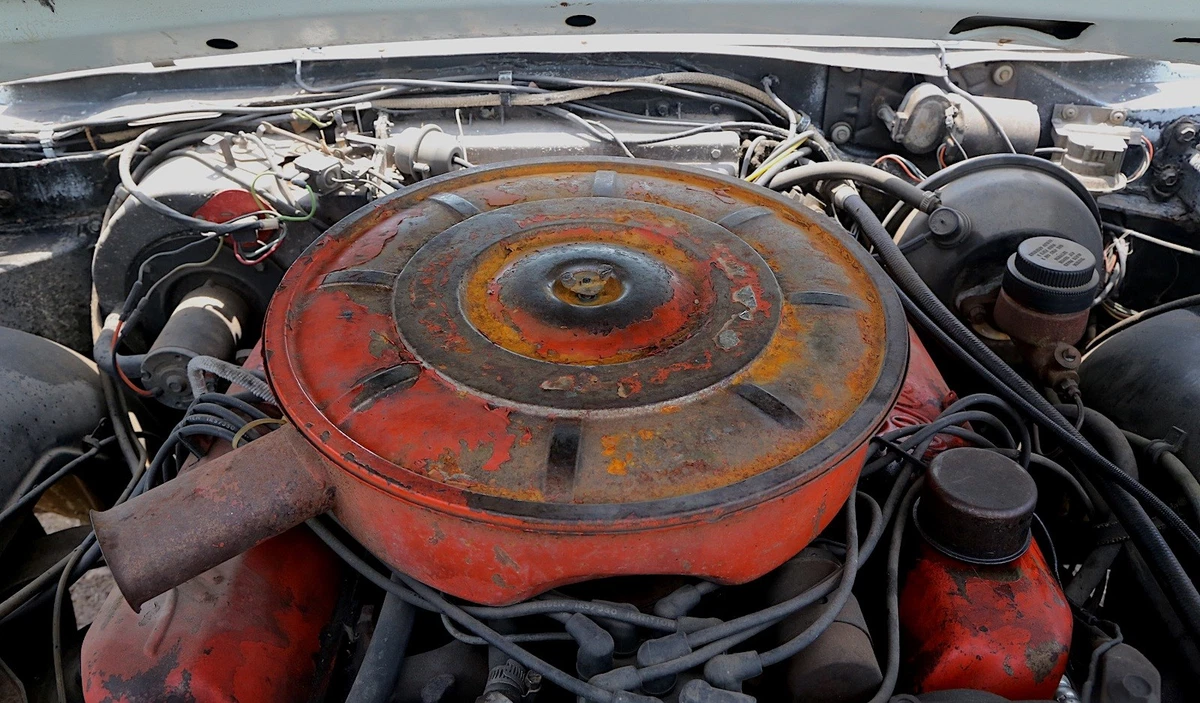
The carburetor lives under the air filter like this one; remove the wing nut to access the carburetor itself.
What Does a Carburetor Do?
Unlike fuel injection, a carburetor is a mechanical metering device that uses several scientific principles to draw fuel into the engine.
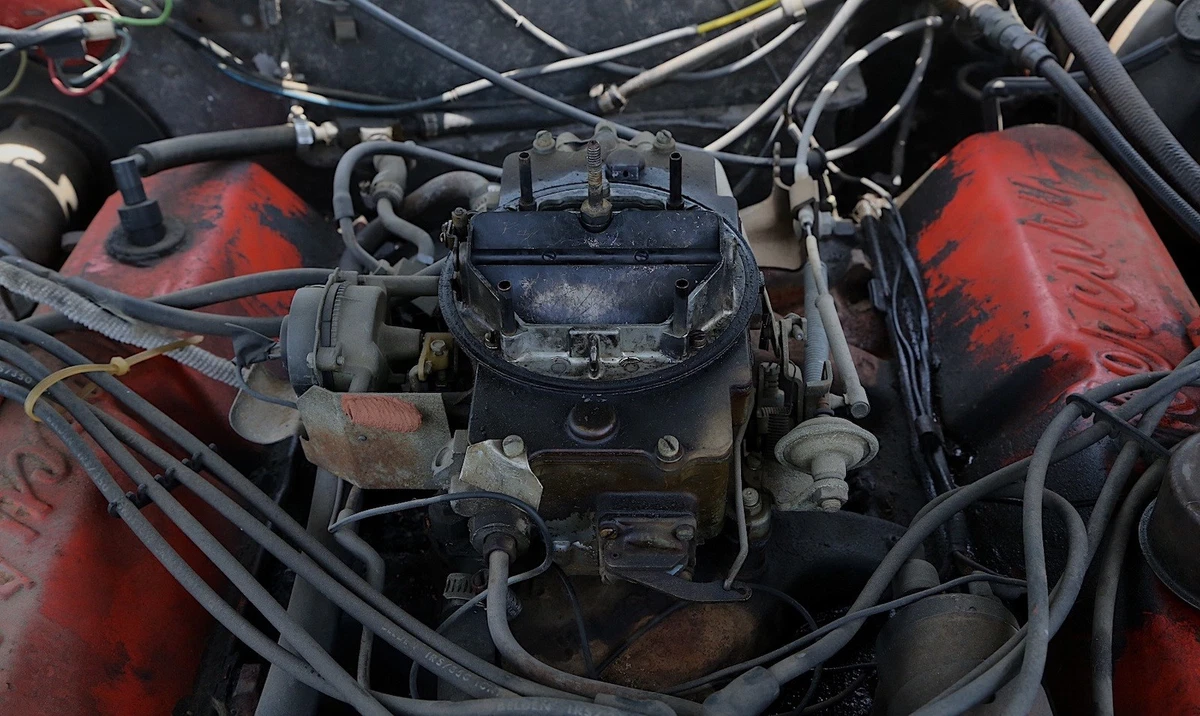
On this 1965 Mercury Park Lane, the carburetor has seen much better days. It is incredibly dirty and gummed with residue.
An engine is nothing more than an air pump. The four-cycle action of the pistons and valves draws air in, squeezes it, combusts the air/fuel mixture, and then pushes the exhaust out. Without a carburetor, your engine can still run wide open and completely uncontrolled as long as you squirt fuel into the intake. The carburetor controls both air and fuel flow.
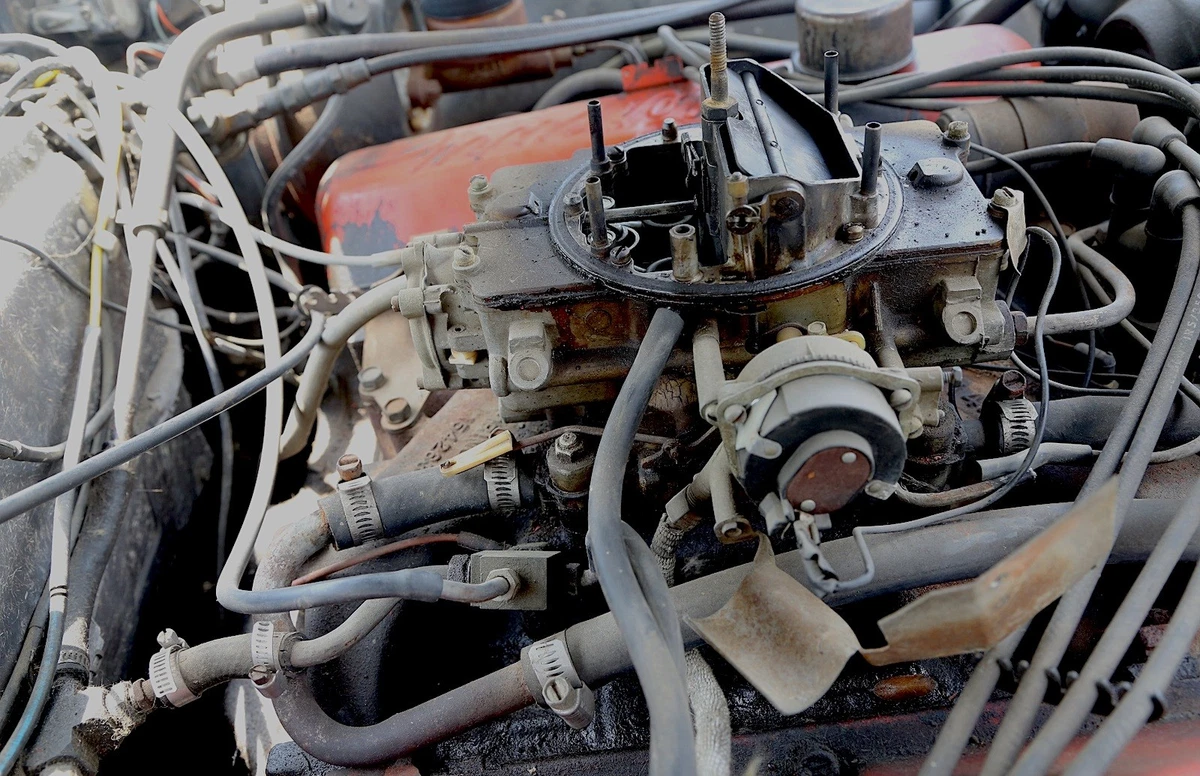
There are a lot of lines on a carburetor, and most of them are vacuum lines. If you have to remove the carburetor, take pics so you can refer to them later.
The carburetor controls airflow via the butterfly blade at the base. Air flows through the barrels (the open holes in the top of the carb), over the venturis (the small halo rings at the top of each barrel), and through the venturi effect, drawing fuel into the engine. A mechanical fuel pump in the carburetor adds an extra squirt of fuel when you step on the gas pedal. This provides the fuel necessary for the sudden burst of air that flows in as the blades open.
Potential Carburetor Problems
Carburetors are intricate mechanical devices with many moving parts that get sticky over time. Many carburetors, with basic maintenance and regular use, can last decades without being rebuilt.
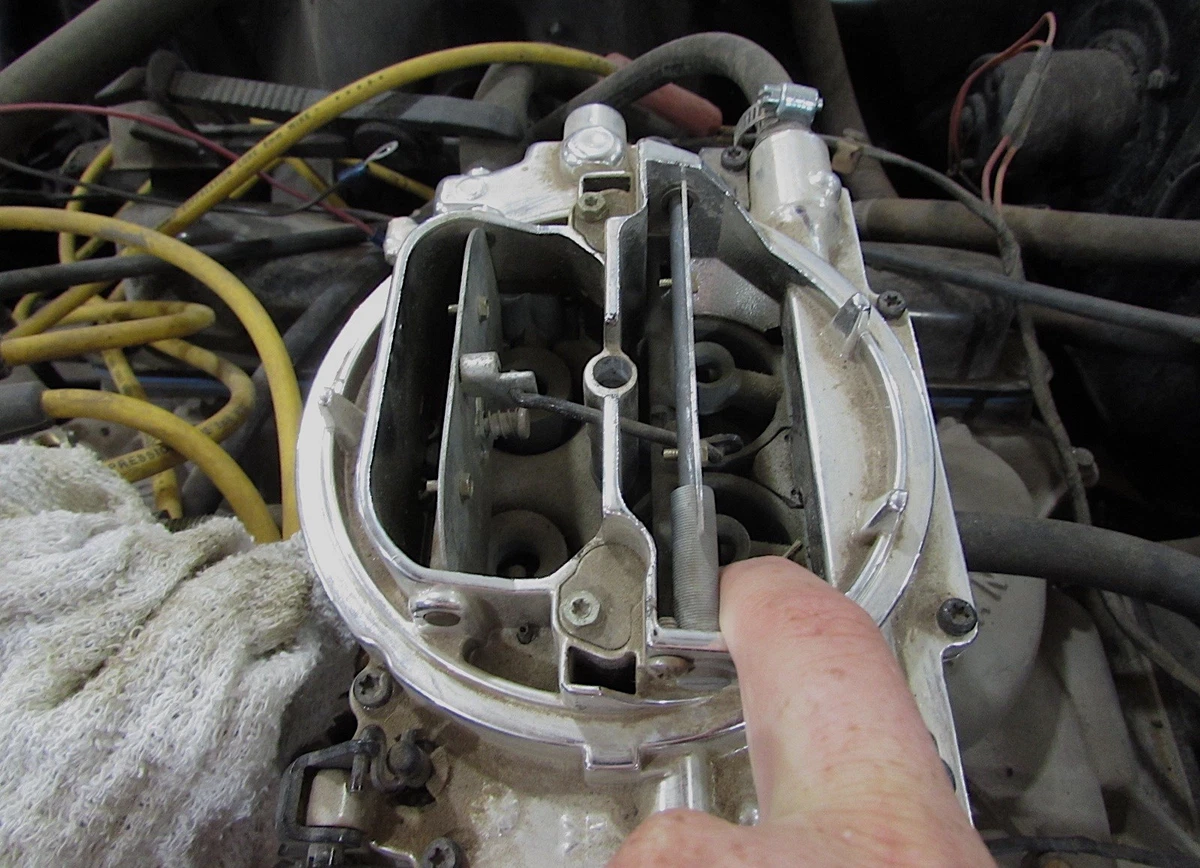
Open the choke and look inside the carburetor for varnish and grime. Carburetor cleaner washes varnish away instantly.
Regular use is the key to carburetors. When fuel sits in the fuel bowls, it slowly evaporates, leaving behind a sticky varnish that doesn’t melt off with fresh fuel. Over time, this buildup causes the internal components to stick and bind, reducing the effectiveness of the carburetor.
Ethanol fuels have the added issue of corroding the metal. As ethanol fuels evaporate, they leave behind a white powdery substance that ruins everything. This is less of an issue if you run the engine at least weekly and long enough to run the old fuel out of the bowl. Adding an ethanol fuel stabilizer - opens in new window or tab. is highly recommended if you use ethanol fuels and your vehicle sits for long periods.
Carburetor Maintenance
You should check your carburetor every 15,000 to 20,000 miles or every six months, whichever comes first. External cleaning is quick and easy, allowing you to look for failing hoses, clamps, linkages, or other components.
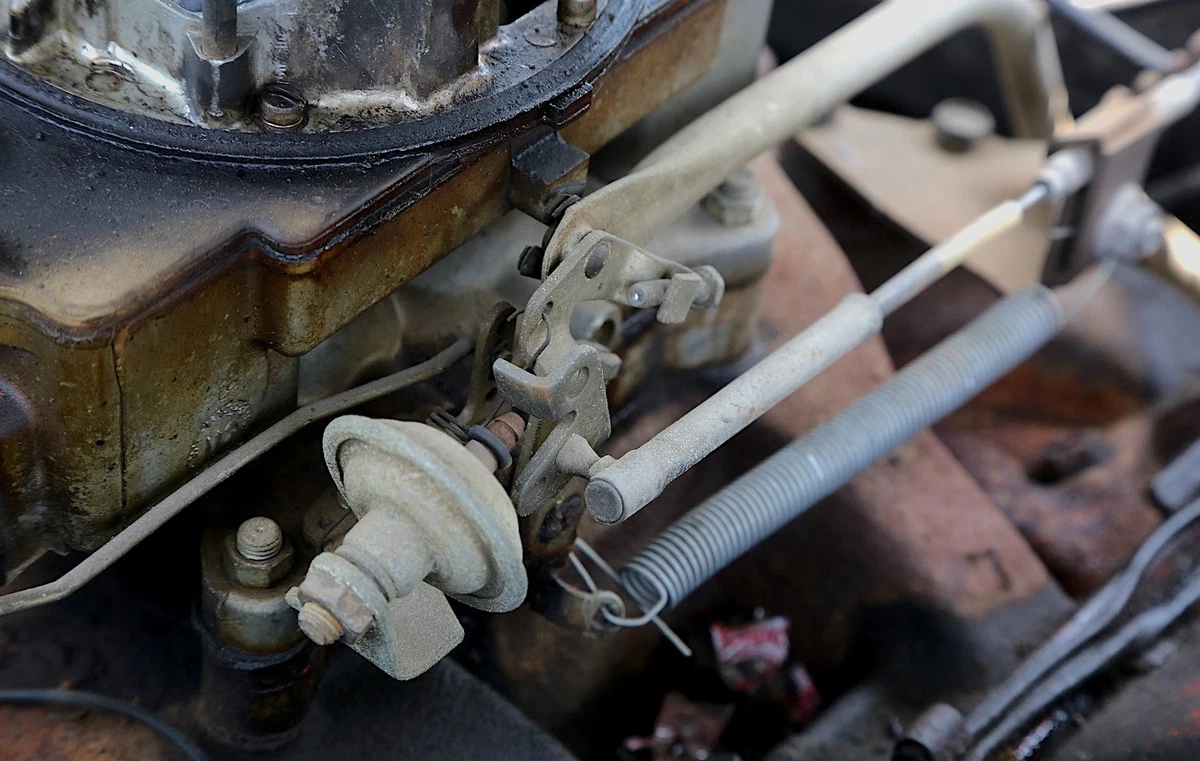
The linkages should move freely and return to the closed position. If they don’t, they need cleaning. Make sure the throttle return spring is connected.
You should also run a bottle of fuel system cleaner - opens in new window or tab. through the gas tank simultaneously. This helps clean any internal varnish or buildup inside the carburetor and fuel system.
Cleaning a Carburetor
You only need a few simple tools to clean a carburetor:
- A can of carburetor cleaner
- A small, stiff brush
If you’re doing a deep clean that requires removing the carburetor from the engine, add a carburetor mounting gasket - opens in new window or tab. to the list of things to buy before beginning.
Light-duty cleaning can be done with the carburetor on the engine. Heavy cleaning may require removal. The following is regarding the most common downdraft style carburetor. Side-draft carburetors such as SU - opens in new window or tab. and Weber - opens in new window or tab. styles are different, and while cleaning and removal are similar, some differences are not reflected here.
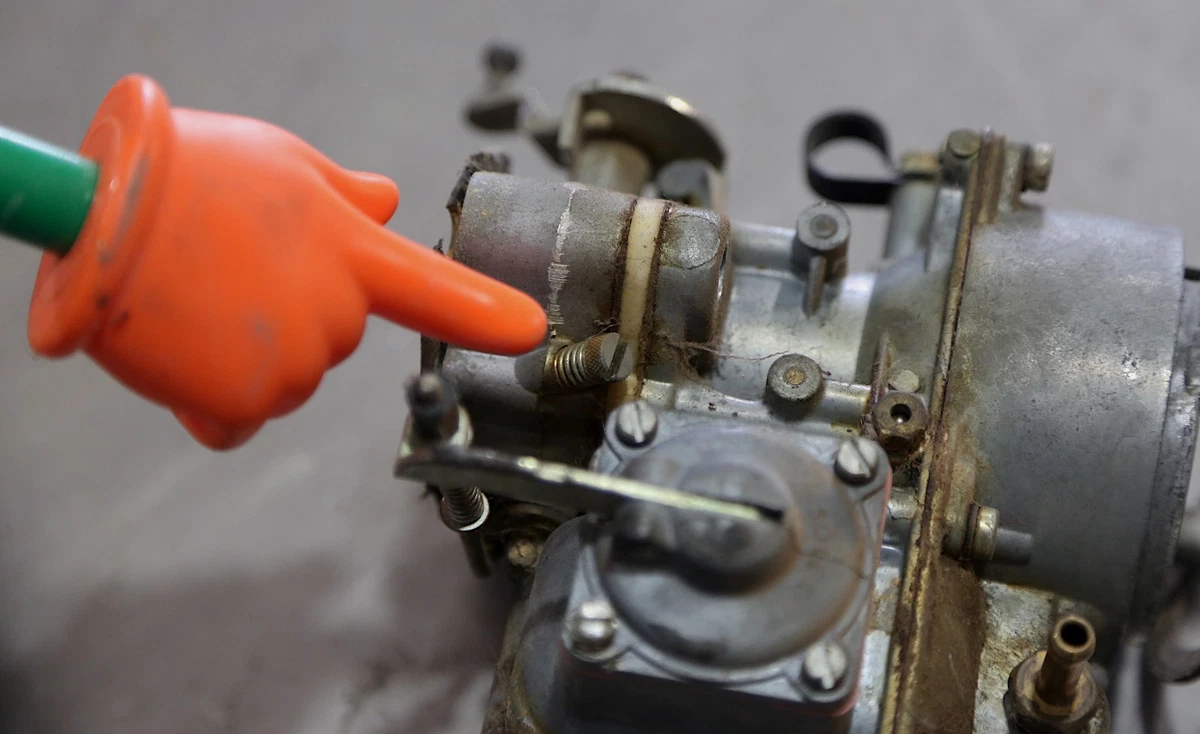
This is an air/fuel mixture screw, don’t make any changes to any of the adjustments unless you know what you are doing. It is very easy to knock a carb out of adjustment, making your engine run poorly.
- Disconnect the battery negative terminal.
- Remove the air cleaner by removing the wing nut on top of the air cleaner. Some European cars use a different style of filter that may bolt or clamp on.
- Examine the carb for signs of leaks, varnish, and sticky deposits.
- Operate the throttle linkage while looking down the barrels. A little shot of fuel should come out of the venturi jets in the front barrels (if it’s a four-barrel carb). Make sure the lower butterflies open.
- Look at the hoses and connections on the carburetor. Any cracked, split, loose, or leaking hose should be replaced. If there are any uncapped ports, locate the hose that belongs there or place a vacuum cap on it.
- Spray the carburetor with the carburetor cleaner spray. Cover the entire carburetor, then wipe it down with a clean shop towel.
- Scrub any sticky linkages and fittings with the stiff brush. Spray with carburetor cleaner, then wipe them off.
- Spray a little carburetor cleaner into the barrels while operating the throttle by hand.
- Replace the air filter and start the engine.
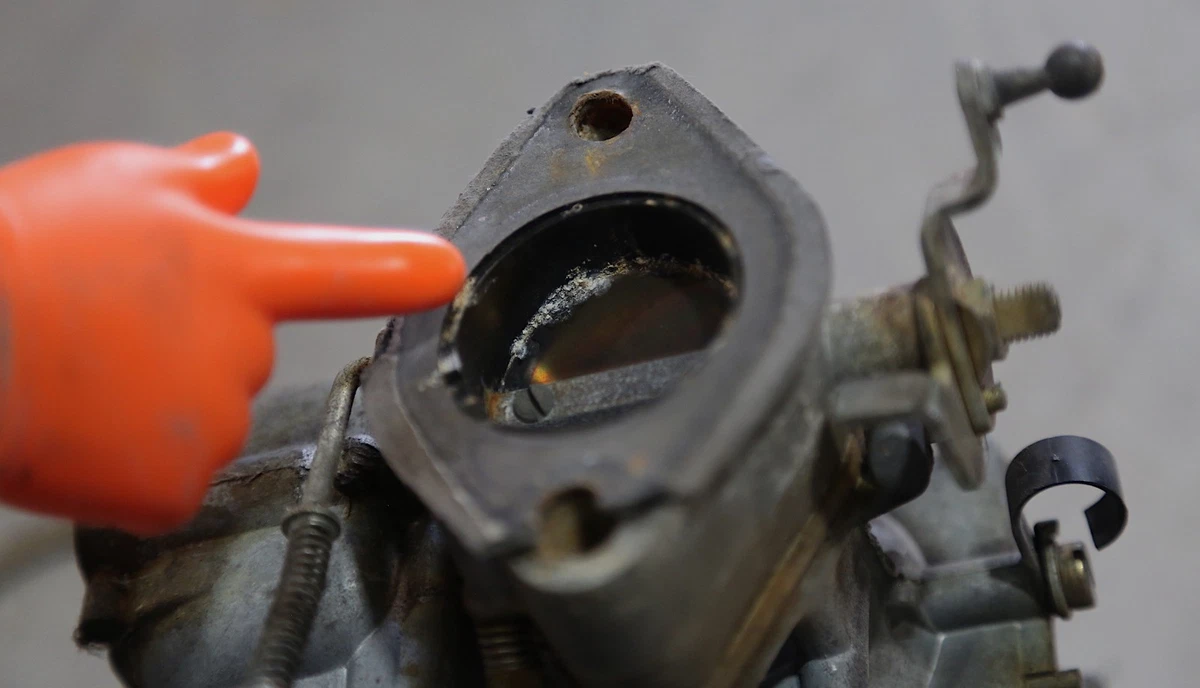
If you see signs like this crusty crud between the different layers of the carburetor body, the gaskets have failed, and it needs to be rebuilt.
If the engine is not running well, the jets are not squirting a strong stream of fuel, the carburetor is leaking around the seals, or the engine has been sitting with fuel in the bowls for a year or more (six months with ethanol fuel), then it likely needs to be rebuilt. While a rebuild is complicated enough to be detailed separately, we will cover the removal process here.
Carburetor Removal
Sometimes, you must pull the carburetor to get it cleaned or rebuilt. This process varies by engine, but the basics are the same.
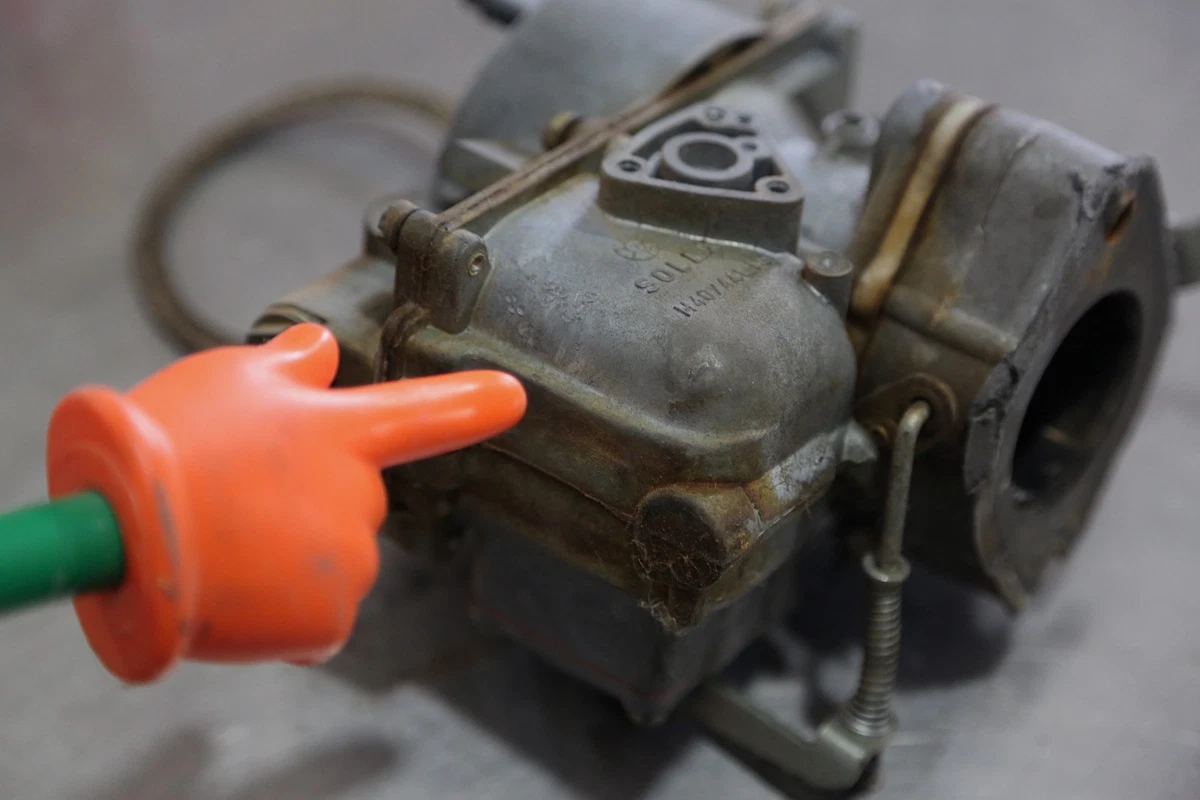
This dirty yellow residue is varnish from leaky gaskets on the carburetor body.
- Disconnect the battery negative terminal.
- Remove the air cleaner by unthreading the wing nut at the top.
- Take a few pics of each side of the carburetor for reference. It is very easy to lose track of the individual connections and linkages.
- Disconnect the throttle linkage and kickdown/TV cables. This may be a ball stud that pops off or a slip-on ring secured with a cotter pin.
- Remove the fuel line. Most carburetors use a hose clamp on a flexible line, but it could be a hard line requiring a line wrench. Using an open-end wrench could strip the nut.
- Disconnect all vacuum lines and label them as you do so they will be easier to reinstall later.
- The carburetor should be free from all lines and linkages at this point. Unbolt it from the intake manifold. Some carburetors have studs, and some use bolts. Be careful with the nuts, bolts, and washers you remove, as you do not want anything falling into the intake while the carburetor is off.
- Carefully lift the carburetor to remove it. It will likely be stuck to the gasket, so you may need a small flat-blade screwdriver or thin pry tool to free it. Set the carburetor aside once removed.
- Remove the old intake carburetor gasket. Use a scraper to clean any remaining material off the mounting flange. Stuff a shop towel into the intake to prevent debris from falling into the engine.
At this point, the carburetor is ready for deep cleaning or rebuilding. Installation is the reverse of removal. If you rebuild your carburetor, you will need to tune it.
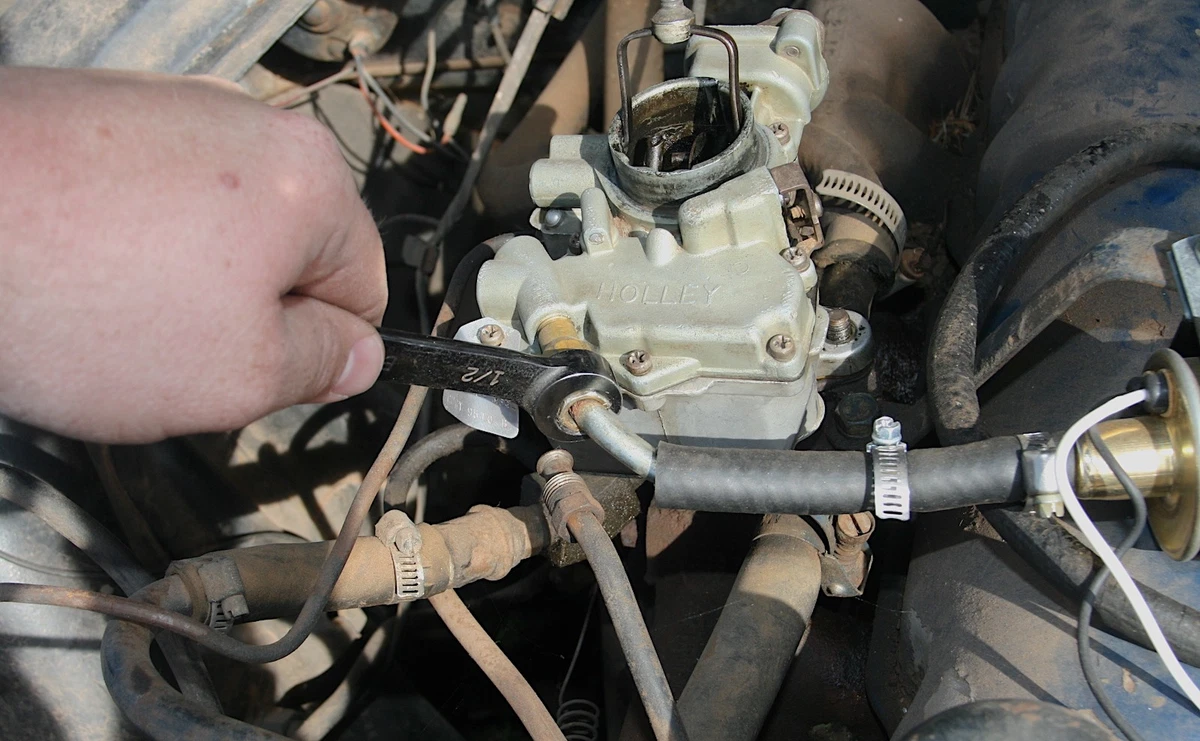
When removing a fuel hard line, make sure you use a line wrench like this to avoid stripping the fitting nut.
If you take the time to regularly check and clean the external body of the carburetor and linkages, along with adding a fuel system cleaner to the fuel, you will keep internal problems at bay for years. Many 60-plus-year-old engines still have the original carburetor in place, having never been rebuilt.
About the author

Share your feedback
This article is meant to provide general guidance only. Automotive maintenance, repair, upgrade, and installation may depend on vehicle-specifics such as make and model. Always consult your owner's manual, repair guide for specific information for your particular vehicle and consider a licensed auto-care professional's help as well, particularly for advance repairs.
Shop project essentials
Recommended for you
Find answers and inspiration

Expert Advice for Checking Your Vehicle’s Engine Oil Level

6 Ways to Dress Up Your Engine

Symptoms of a Bad Crankshaft Sensor

Diagnosing and Replacing a Bad Car Starter

How to Replace Engine Mounts
4 min read
The Right Tools to Clean Your Fuel Injectors
6 min read
How to Replace an Exhaust Gasket
9 min read
How to Buy the Best MAF Sensor
4 min read
Ignition Wire Buying Guide
6 min read
A Complete Guide to Cylinder Heads

Purpose of the Engine Mount and Signs of Failure

A Quintessential Monster Miata with a Mustang V-8

How to Buy the Right Ignition Coils
7 min read
Chevrolet LS9: The Ultimate LS-Series Engine

How to Change an In-Tank Fuel Pump
9 min read
Squeaks, Clangs and Rattles: Car Noises That Need Attention

Why Regular Care of Your Fuel Pump Is a Must

All About Crankshafts and How They Work

Interpreting Engine Codes Is Easy With Right OBD Reader

How to Clean a Carburetor

A Quick Guide to Valve Cover Gaskets
6 min read
How to Replace a Fuel Filter
7 min read
Finding the Best Engine Air Filter for Your Car
4 min read
How to Replace a Throttle Body
6 min read
Do You Have a Faulty Mass Air Flow Sensor?
4 min read
What to Do About a Dirty Oxygen Sensor
4 min read
Buying the Best Portable Car Battery Jump Starter
6 min read
What You Should Know About O2 Sensors
6 min read
Understanding Your Car's Idler Pulley
4 min read
How to Test an Alternator (And Fix It!)

How To Fix a Crankshaft Position Sensor Wiring Harness
7 min read
Why Is Your Car Burning Oil?

When to Replace Your Exhaust Manifold Gasket
6 min read
An Overview of Car Engine Parts
5 min read
What Is a Camshaft Position Sensor?

How to Replace a Distributor Cap and Rotor
5 min read
4 Easy DIY Upgrades of Your Car's Ignition System

Identifying Common Engine Leaks

Ignition Coils Help Spark Horsepower

Everything You Should Know About Glow Plugs

P0420 Engine Code: What It Means and How to Fix It
5 min read
Everything You Need to Know About Fuel Filters
6 min read
Engine Mounts 101
4 min read
5 Small Car Maintenance Tasks To Prevent Big Problems Later

How to Replace a Serpentine Belt Tensioner
4 min read
Can a Cold Air Intake Add 30 Horsepower?

Spotting Intake Manifold Gasket Problems
7 min read
Symptoms and Fixes for a Bad Thermostat

How to Replace an Ignition Coil
6 min read
Custom Exhaust Tips: Make a Statement with Your Tailpipes

What to Expect From an Emissions Test

All About Cylinder Head Gaskets

All About Mass Air Flow Sensors

How to Fix Low Oil Pressure
4 min read
How to Find and Fix an Exhaust Leak

How Much Does an Alternator Cost?

Why Is a Hemi Engine So Special?

Get Your Classic Car Ready for Winter

The Difference Between Camshafts and Crankshafts
4 min read
Engine Air Filter Change 101

Engine Blocks: Everything You Need to Know

Troubleshooting a Car That Doesn’t Start

What Does the Check Engine Light Mean?

Deciding to Buy Original or Aftermarket Auto Parts: Quality and Selection

How Long Do Car Batteries Last?

How an Oil Pump Works

The Anatomy of a Spark Plug

How To Gap a Spark Plug

How to Replace an Intake Manifold Gasket
7 min read
Cabin Air Filter vs. Engine Air Filter: What’s the Difference?

Why Your Car Won’t Start

What You Should Know About Cylinder Heads

How to Replace Ignition (Spark Plug) Wires
5 min read
4 Types of Water Pumps

Signs of a Bad Car Battery vs. Alternator

What Is a PCV Valve? And How to Replace One

Engine Oil Flush 101

Online Videos Are a Game-Changer for DIY Car Repair

When to Replace Your Drive Belt
6 min read
How to Buy the Right O2 Sensor
5 min read
What Is a Catalytic Converter and Why Are People Stealing Them?

Synthetic Oil or Conventional Oil: What’s Best for Your Vehicle?

All About Engine Leak Down Testing
A Guide to Cleaning a Throttle Body

How to Remove Rusted Nuts and Bolts

Cleaning Your Engine Bay: Step-by-Step Instructions

Timing Belts 101
5 min read
How to Buy the Right Car Distributor
6 min read
How to Do an Engine Compression Test
5 min read
Choosing the Best Intake Manifold Gasket
7 min read
What Does the Dashboard Oil Light Warning Mean?
5 min read
The Brave New World of Ultra-Easy Fuel Injection

Your Complete Idler Pulley Buying Guide
5 min read
How to Choose the Best Oil Filter

How to Replace an Alternator Belt

Deciding to Buy Original or Aftermarket Auto Parts: The Online Transaction

How to Jump Start a Car Battery

Buying the Right Engine Mount
5 min read
All About Exhaust Gas Recirculation (EGR) Valves

Winter Car Prep: 5 Essential Articles

Five Signs Your Spark Plugs Need Changing
5 min read
How to Replace an Oxygen Sensor
5 min read
Make an Old Car Run Like New: Four Common Sense Tips

All About Your Distributor Cap and Rotor
7 min read
How to Replace a Valve Cover Gasket
7 min read
Car Starter Motors and How Long They Last

Easy DIY Project: Replace an Oxygen Sensor
How to Keep a Ford Flathead V-8 Alive
8 min read
How to Replace a Car Starter
7 min read
What to Check and What to Replace at 100,000 Miles
4 min read
How to Clean Fuel Injectors
8 min read
MAP Sensors and Managing Air Flow

How Long Does an Oil Change Take?

The Weirdest Oddball Car Engines of All Time

How to Choose the Best Spark Plugs
5 min read
All About Vehicle Emission Systems

Tax Refund on the Way? It’s Time to Think About Supercharging
How to Replace an Engine Air Filter
5 min read
Brake Cleaners Versus Carburetor Cleaners

Signs That a Timing Chain Needs Replacement
5 min read
How to Replace an EGR Valve
5 min read
An Expert Guide to Exhaust Systems

How to Buy the Right Valve Cover Gasket
4 min read
Car Muffler Types and How They Change Your Exhaust Note

How Long Do Electric Car Batteries Last? And Other EV Questions

Explaining the Throttle Body and Position Sensor
4 min read
Ethanol Fuel Boosts Performance and Costs Less

Spark Plugs 101
7 min read
The Alternator Is Your Car’s Little Electric Power Station

One Day Project: Rebuild Your Carburetor

Should You Rebuild or Replace Your Carburetor?
4 min read
Which OBDII Scanner Do You Actually Need?
4 min read
Taking Your Car to the Track: The Ultimate Guide

Try a Catalytic Converter Cleaner Before an Expensive Repair

The Right Liquids for High-Performance Engines

In Age of Computerized Cars, Tuning Gets an Update

How to Buy the Right Timing Belt and Related Tools
5 min read
NASCAR Engines Versus What Powers Your Car

How To Choose the Best Supercharger

Understanding Battery Sizes (and Battery Group Size Charts)
7 min read
How to Buy the Right Exhaust Manifold Gasket
6 min read
How to Change a Timing Belt
12 min read
History of the Rotary Engine: Past, Present and Future

How to Buy and Build a Gen-1 Coyote Ford Mustang
7 min read
How to Buy the Right Throttle Body
5 min read
Clean Fuel Filters Are Critical for Performance

How to Change Your Oil: Visual Step by Step Guide

How a Car Engine Works

Why an Engine Overheats and How to Fix It

Everything You Need to Know About Car Starters
7 min read
Reduced Engine Power and What To Do About It
5 min read
Regularly Check These 4 Car Fluids

How to Buy the Right Car Starter
5 min read
Understanding Engine Horsepower vs. Brake Horsepower

Distributors 101
6 min read
How to Change Oil in a Car
8 min read
Cold Air Intake 101: How It Works

How to Clean Or Replace Your Air Filter

Top Candidates for an Affordable V8 Swap

Are Ticking Engine Noises a Warning? Or Just Annoying?

Types of Twin Turbos (And Why You Want One)

How Solenoids Work in Starters and Automatic Transmissions

An Introduction to Cleaning Fuel Injectors
5 min read
Choosing a Supercharger Versus Turbocharger

How to Get Started with an LS Engine Swap

P0302 Engine Code: What It Means and How to Fix It
6 min read
The Dry Sump System Explained

How to Replace a Mass Air Flow (MAF) Sensor
7 min read
Facts About Diesel Exhaust Fluid

Protect Your Catalytic Converter with a Shield or Lock

What Octane Is Best for Your Car?
4 min read
Buying the Right Serpentine Belt and Tensioner
4 min read
A Performance Data Recorder (PDR) Adds Racing Analytics to Your Car

Deciding to Buy Original or Aftermarket Auto Parts: The Basics

What to Know About Your Vehicle's Throttle Body
6 min read
Diagnosing Your Serpentine Belt and Tensioner
6 min read
A Guide to Car Clutches
7 min read
Choosing the Best Drive Belt for Your Car
6 min read
How to Replace a Fuel Pump

Basic Car Maintenance Is Simpler Than You Think

The Importance of the Drive Belt Tensioner

Why You Should Add an Engine Oil Cooler

How to Replace a PCV Valve
6 min read
Buying the Right PCV Valve
4 min read
Hisses, Whines, and Rattles: What Your Car Is Trying to Tell You

Carburetors vs. Fuel Injection: For Show or Go?

Buying the Right Distributor Cap and Rotor
4 min read
All About Exhaust Gaskets

Taking Vintage Cars Out of Storage: Planning for Spring

How to Replace Spark Plugs
7 min read
What Is a Serpentine Belt and How Do You Change It?

How to Replace a Drive Belt
5 min read
Tips and Tricks to Manage Engine Heat

An Essential Guide to Timing Belts

How to Test Your PCV Valve
6 min read
Porsche Boxster IMS: What to Know
5 min read
How to Buy the Right 1970-74 Barracuda Trim Parts
4 min read
Everything You Should Know About EGR Valves
5 min read
A Deep-Dive Guide to Ignition Wires
7 min read
When to Replace Your Engine Air Filter
5 min read
How to Pick the Right “Parts Car”

Choosing the Right Fuel Filter for Your Vehicle
6 min read
How to Choose the Best Fuel Pump
6 min read
OBD Port Uses for Amazing Digital Car Hacks
What to Buy First for Your LS Chevelle Swap
9 min read
How to Use an Engine Timing Light

ECU 101: What Is an Engine Control Unit?

Causes and Cures for Oil Pan Leaks

How to Tune Your Exhaust Note
Choosing the Best Motor Oil
4 min read
How Do Ignition Coils Work?
5 min read
Fuel Pumps and How They Work
8 min read
What a Fuel Pressure Gauge Does and Why You Need One

4 Bolt-On Engine Power Upgrades That Add Crazy Combustion

Changing Your Oil: 5 Things to Know
6 min read
How Does Engine Braking Work?

How to Buy the Right EGR Valve and Gasket
6 min read
Big Block vs. Small Block: Which Engine Is Best?

How to Choose the Best Motor Oil
8 min read
A Double Whammy: Combining a Supercharger and Turbocharger